
Mastering CSS Selectors: Understanding Specificity and Best Practices
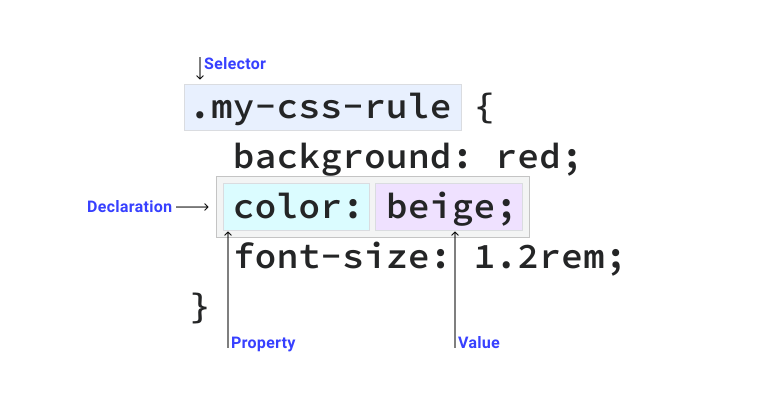
A comprehensive guide to CSS selectors, specificity calculation, and implementation best practices for clean and maintainable stylesheets.
CSS selectors are the foundation of styling web applications. Understanding how they work, particularly their specificity, is crucial for writing maintainable and scalable CSS. This guide will help you master CSS selectors and avoid common pitfalls.
Understanding CSS Specificity
Specificity is the algorithm browsers use to decide which CSS rules to apply when multiple rules target the same element. Think of it as a score or weight that determines which styles take precedence.
The Specificity Calculator
Specificity is calculated using a four-part value system (a,b,c,d), where:
/* Specificity: a,b,c,d */
/* a: Inline styles */
/* b: ID selectors */
/* c: Classes, attributes, pseudo-classes */
/* d: Elements, pseudo-elements */
Points are assigned as follows:
- Inline styles (
style
attribute): 1,0,0,0 (1000 points) - ID selectors (
#id
): 0,1,0,0 (100 points) - Class selectors (
.class
): 0,0,1,0 (10 points) - Element selectors (
p
,div
): 0,0,0,1 (1 point)
Specificity Examples
/* Specificity: 0,0,0,1 = 1 point */
p {
color: blue;
}
/* Specificity: 0,0,1,0 = 10 points */
.text {
color: red;
}
/* Specificity: 0,1,0,0 = 100 points */
#header {
color: green;
}
/* Specificity: 0,0,1,1 = 11 points */
p.text {
color: purple;
}
/* Specificity: 0,1,1,1 = 111 points */
#nav p.highlight {
color: yellow;
}
Understanding Pseudo-Class Specificity
Pseudo-classes have different specificity weights depending on their type and usage. Here's a comprehensive breakdown:
The :where() Pseudo-Class - Zero Specificity
The :where()
pseudo-class is unique because it has zero specificity (0,0,0,0), making it perfect for creating reusable styles that are easy to override:
/* Specificity: 0,0,0,0 */
:where(.header, .footer) p {
color: blue;
}
/* This will override the above rule even with lower specificity */
p {
color: red;
}
/* Compare with :is() which takes the highest specificity of its arguments */
:is(.header, #footer) p {
/* Specificity: 0,1,0,1 */
}
Common Pseudo-Class Specificities
-
Regular Pseudo-Classes (0,0,1,0)
/* All these have specificity of 0,0,1,0 = 10 points */ .button:hover { } .input:focus { } .link:visited { } .item:first-child { }
-
Pseudo-Elements (0,0,0,1)
/* All these have specificity of 0,0,0,1 = 1 point */ p::before { } div::first-line { } span::after { }
-
Functional Pseudo-Classes
/* :is() takes highest specificity of its arguments */ :is(#header, .nav) { } /* Specificity: 0,1,0,0 */ /* :not() adds specificity of its argument */ :not(#nav) { } /* Specificity: 0,1,0,0 */ :not(.nav) { } /* Specificity: 0,0,1,0 */ /* :has() adds to specificity like a pseudo-class */ .container:has(.title) { } /* Specificity: 0,0,2,0 */
Strategic Use of :where()
:where()
is particularly useful for creating default styles that are easily overridable:
/* Base styles with zero specificity */
:where(h1, h2, h3, h4, h5, h6) {
margin-top: 0;
line-height: 1.2;
}
/* Easy to override without specificity wars */
h1 {
/* Specificity: 0,0,0,1 */
margin-top: 1rem;
}
/* Useful for third-party component overrides */
:where(.third-party-component) .button {
/* Your custom styles that won't fight with the library */
}
/* Complex selectors made simple */
:where(article > *:not(:first-child)) {
margin-top: 1rem;
}
Combining Pseudo-Classes
Understanding how specificity combines with multiple pseudo-classes:
/* Multiple pseudo-classes add up */
.button:hover:focus {
/* Specificity: 0,0,3,0 */
}
/* Using :where() to control specificity */
.button:where(:hover, :focus) {
/* Specificity: 0,0,1,0 */
}
/* Complex real-world example */
:where(section:hover, article.active) :is(.title, .subtitle):not(.ignored) {
/* Breaks down as:
:where() = 0,0,0,0
:is() = 0,0,1,0
:not(.ignored) = 0,0,1,0
Total specificity: 0,0,2,0
*/
}
The !important Exception
The !important
declaration breaks the normal specificity rules and takes precedence over all other declarations. However, it should be used sparingly as it makes styles harder to maintain:
/* Even with lower specificity, this will win */
.button {
color: red !important;
}
/* This won't apply even with higher specificity */
#header .nav .button {
color: blue;
}
Best Practices for CSS Selectors
1. Keep Specificity Low and Predictable
Start with low specificity and increase only when necessary:
/* ❌ Avoid: High specificity */
#main-content .article-wrapper div.content p.text {
color: black;
}
/* ✅ Better: Low, predictable specificity */
.article-text {
color: black;
}
2. Use Classes as Primary Selectors
Classes provide a good balance between specificity and reusability:
/* ❌ Avoid: Element selectors */
div p span {
color: blue;
}
/* ✅ Better: Class selectors */
.description-text {
color: blue;
}
3. Avoid ID Selectors for Styling
Reserve IDs for JavaScript hooks and use classes for styling:
/* ❌ Avoid */
#main-navigation {
background: navy;
}
/* ✅ Better */
.main-nav {
background: navy;
}
4. Follow BEM Naming Convention
BEM (Block Element Modifier) helps maintain low specificity while providing clear structure:
/* Block */
.card {
}
/* Element */
.card__title {
}
.card__image {
}
/* Modifier */
.card--featured {
}
.card__title--large {
}
5. Avoid Descendant Selectors
Deep nesting increases specificity and creates tight coupling:
/* ❌ Avoid: Deep nesting */
.sidebar .nav .list .item .link {
}
/* ✅ Better: Flat structure */
.nav-link {
}
6. Use Semantic Class Names
Name classes based on their purpose, not their appearance:
/* ❌ Avoid: Appearance-based names */
.blue-text {
color: blue;
}
.left-margin {
margin-left: 20px;
}
/* ✅ Better: Semantic names */
.primary-text {
color: blue;
}
.content-spacing {
margin-left: 20px;
}
7. Leverage CSS Custom Properties
Use CSS variables for better maintainability and reduced specificity:
:root {
--primary-color: #007bff;
--spacing-unit: 8px;
}
.button {
background: var(--primary-color);
padding: calc(var(--spacing-unit) * 2);
}
8. Use Modern Selectors Wisely
Modern CSS provides powerful selectors that can help reduce specificity and write more maintainable code:
/* Direct child selector */
.container > .item {
margin-top: 1rem;
}
/* Adjacent sibling */
.label + .input {
margin-left: 0.5rem;
}
/* Previous sibling using :has() */
.input:has(+ .error) {
border-color: red;
}
/* Multiple previous siblings */
.form-group:has(+ .error, + .warning) {
margin-bottom: 2rem;
}
/* Attribute selectors */
[aria-expanded="true"] {
display: block;
}
[data-type="primary"] {
background: var(--primary-color);
}
/* :is() for grouping */
:is(.card, .panel, .modal) .title {
font-size: 1.25rem;
}
/* :where() for zero specificity grouping */
:where(.alert, .toast) {
padding: 1rem;
border-radius: 4px;
}
These modern selectors provide several advantages:
- More precise targeting without increased specificity
- Ability to style elements based on their siblings (both forward and backward)
- Better semantic meaning with attribute selectors
- Reduced repetition with grouping selectors
- More maintainable and readable code
Common Pitfalls to Avoid
-
Overusing !important
- Makes styles hard to override
- Creates specificity wars
-
Selector Performance
- Extremely specific selectors can impact rendering
- Right-to-left matching by browsers
-
Tight Coupling
- Avoid styling based on DOM structure
- Use classes for flexibility
-
Global Scope
- Consider using CSS Modules or scoped styles
- Namespace classes when needed
Conclusion
Understanding CSS specificity and following selector best practices leads to more maintainable stylesheets. Remember:
- Keep specificity low and predictable
- Use classes as your primary selectors
- Follow naming conventions
- Avoid specificity hacks
- Write selectors that are both efficient and maintainable
By following these guidelines, you'll create CSS that's easier to maintain, scale, and debug.